Tuesday, July 5, 2022

Newton's Nook Challenge #176 Favorite!

 YEY!  For the latest Inky Paws Challenge over at Newton's Nook, my card made it to the favorite list!  

These colors were so nice, and such fun to work with.

And, here's my card!

Newton's Nook:
Newton Loves Tacos Stamp and Die
Fireworks Stencil

Distress ink in Candied Apple
Distress Oxide in Peacock Feathers and Prize Ribbon

Sweet Kitty colored with alcohol markers
Scallop circle cut with my Cricut

Sentiment stamped with Candied Apple using some "random" wood mounted rubber ABC stamps that I probably got at Hobby Lobby or Michaels "dollar bin" :)

I used the "Distress Oxide Ink Rub" technique from Nina Marie's blog


Tuesday, June 7, 2022

Lawn Fawnatics Challenge Featured!

 YEY!  I have been featured on the one stamp company that got me going in stamping!  LAWN FAWN!!! I found them several years ago before I even had stamps, dies, markers, inks or anything!  I was addicted to watching them color and stamp and die cut the cute little images!  Long story short, and LOTS of  money spent later... 

I'm not only really excited, I'm completely Honored that the lovely designers choose to feature my sweet little card!

FEATURED FAWNATICS AND CHALLENGE 125 RANDOM WINNER

Challenge was Dies Only

Dies I used:
Smiley S'more
Small Stitched Rectangle
Puffy Cloud Borders
Stitched Hillside Borders
Trees from Shadow Box Card
Logs and fire from Shadow Box Card Fireplace Add On
Hearts from Scalloped Box Card Popup
Big Hugs from Big Scripty Words


NEW BADGE!!!

WOOOO HOOOO!!!


Thank you!  And, I cannot wait for the next challenge!  So much fun!!!

Wednesday, May 11, 2022

Newton's Nook Challenge 173

 So, I finally got one of the funniest Newton's Nook set ever!  Newton Loves Tacos!  I just could not WAIT to make a card with it!  Life kept getting in the way, but I was able to get some good ideas together, then I saw a color challenge from Newton's Nook so I said GAME ON!

What great Colors! Oh look LIME!  
LET'S DO THIS!


I was inspired by a couple of my Favorite Designers!  

She often does "Ink Smooshing" on her blog, and I love how she takes a piece of plastic (she uses a clear stamp pouch, I usually use the clear plastic wrap that comes on stamp sets) and uses it to see where she is placing the ink, controlled ink smooshing. I of course chose the 4 colors and did 4 different back grounds using the this technique.  Full disclosure, I use this technique ALOT!  Its fun to mix and match the colors, and it makes such interesting backgrounds!

I love Laura and her fun videos.  "Dimension is LIIIIIIFE!!!"  
Anyway, She often does backgrounds by taking strips of paper and gluing them down to make patterns.  So, I did that!  See this blog post about 50 seconds into the video she does the "strip it up" technique.

Backgrounds
Green:  I used Mowed Lawn Distress Ink and Zig  Clean Color Real Brush Watercolor markers in 045 Pale Green and 004 FL. Green
Yellow:  Distress Ink in Antique Lenin and Mustard Seed
Orange: Distress Ink in Scattered Straw and Orange Marmalade
Pink: Distress Ink in Spun Sugar and Picked Raspberry

I then cut them in as similar as I could diagonal strips and placed them on the table in order so I could pick and choose.  Since I had 4 single backgrounds, I was able to do 3 card backgrounds.  I had to cut a few of them to make them fit, so there wasn't enough to make 4. 

I then used my tape runner on a solid piece of card stock and placed the strips in order, and trimmed the edges so they would be a little smaller than a standard A2 card.

Meow-Garitas!
Since I just HAD to use lime, here it is!


Alcohol markers for Newton and the Marg
Random Paper Scraps from my Card Making and Scrapbooking Fun!
Memento Tuxedo Black Ink for stamping

TACOCAT spelled backward is TACOCAT


Alcohol markers for the TacoCats
Random Paper Scraps from my Card Making and Scrapbooking Fun!
Memento Tuxedo Black Ink for stamping
Washi Tape (probably from my mom who ordered it from Wish)
The orange thread is from Newton's Nook Packaging!  NICE!

Taco Tuesday!


Alcohol markers for the Taco Eatin Cat
Random Paper Scraps from my Card Making and Scrapbooking Fun!
Distress Ink Picked Raspberry on the circles
Memento Tuxedo Black Ink for stamping


I hope you like these cards as I had an HUGE BLAST making them and I so totally love this set!  I will be using it A LOT!  So fun and cute!  Thanks Newton!


Monday, March 28, 2022

Newton's Nook Challenge 170

This is my adorable entry into the Newton's Nook Inky Paws Challenge 170, which took me several tries to get Newton just right!


I used Newton's Nook Ornamental Newton for the stamp, with a little creative masking to make it look like a ball instead of an ornament.
Other products:
Distress Oxide in Blue Prize Ribbon and Wild Honey
Copic and other Alcohol Markers
Gelly Roll white gel pen
Ranger Ink Emboss It Pen Clear
White Embossing Powder

Circle stencil is one that me and my husband designed and printed out on our 3D Printer!  
Sentiments is my own hand writing

 
the original stamp set, sadly is retired, and one of my favorites!  
Newton's Christmas Stamps are some of the best out there!


I used a sticky note to stamp first, then trimmed out the parts I wanted to mask, and then stuck them on the stamp, inked it up, then used my MISTI to do the work.  It took me several tries to get it right, then, this happened....


I just HATED the coloring!  It was stamped on inexpensive cardstock and the ink bled pretty awful.  I also hated the color choices.  the first two cats didn't do well, the inside of the ornament still stamped a little, and one I didn't trace the circle well.  By the way, did you know that a standard poker chip is about the same diameter as this ornament?  Yeah!  I thought it was cool too!

So hope I win the random drawing, since I only have Christmas stamps, cactus, and a valentine themed stamp.  I want to get some of the new spring sets!!


Sunday, March 20, 2022

Having fun with a Challenge!

I am loving doing some card challenges!  I actually submitted my very first challenge to Newton's Nook, let me know what you think!


I used the Cultivated Cacti stamp and die set for the back ground, and Cuppa Cactus stamp and die set for the really cute cactus in a cup!!!  

AND, my first time out I was selected as a favorite!  YEY!  So, I get to use this badge and I'm so excited!  I will be doing more of these challenges, first of all they are really fun, and you could win store credit so why wouldn't we do it!


Friday, February 18, 2022

Christmas Card and Tags 2021

 I feel like I've dropped off the face of the earth for a while.  We have had several health scares in the family and I've been away from blogging just as I was starting up again.  I have been making cards since, but unable to post until now.

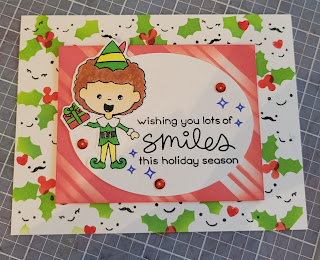
My husband and I got into designing stencils and printing them on the 3D printer!  This was our attempt at layering, with the leaves and the berries.  I think it turned out nice!  And, I added the smiles for fun!
The candy stripes is ALSO a home made stencil!  

Distress Oxides - mowed lawn, candied apple
Kindred Stamps - Santa's Elf
Lawn Fawn - smiles from Pizza my Heart, sentiment from Merry Messages
Copic Coloring


I love making Christmas scenes! 
Kindred Stamps - Merry Whatever (retired)
This tree is from a random stamp set I got years ago, but it's awesome!
Copic Color
Distress Oxide - Ocean

I LOVE making Tags! I don't buy them anymore!  I have a TON of Christmas themed paper so I try to use it as much as possible

Avery Elle Merry Circle Tags and 
Avery Elle-ments Holiday Circle Tags
Lawn Fawn inks in Fish Tank, Sunflower, Jalapeno, Lobster
(Note, these inks are AMAZING, but the Lobster totally stains the stamps!)
various stickles to match

I made cards for Jake's Teachers, this turned out so freakin cute!
Brick Stencil is home made by me and Dean!
Distress Oxide Fired Brick and Black Soot

Lawn Fawn Die Shadow box card dies with Fireplace Add On
Lawn Fawn Reveal Wheel Square Window Add On
The portraits are just snippets from a really colorful Christmas printed paper I had in my stash

This is a spinner card!  I just absolutely LOVE this nutcracker set, and since the guy is symmetrical, he spins well!

Newton's Nook Nutcrackers
Glitter and other printed cardstock
Copic Coloring

I also had to make a bunch of last minute cards that I wanted to "mass produce".

Simon Says Stamp Happy Poinsettia
Avery Elle Merry Circle Tags sentiment
Lawn Fawn Inks in Lobster, Jalapeno, and Sunflower
Red Stickles


Thursday, October 21, 2021

Halloween Costume Time!!!! Part 4 - The finishing touches

AAAAAAAAAAAAAAAAND WE MADE IT!!!!

This was a really long process of research on all sorts of cool Cosplay sites and 3D printing sites, but we are finished and all is AWESOME!


The (almost) finished helmets.  I still have to add the face shield and "skuff up" Boba Fett's helmet.
I used some clear face shields we had on hand, may go get some window tint for Halloween, but it will be dark, so I think the clear works for 10 yr old boys!

 
Jet pack and both helmets done!!!!

 
And, the Big show, at the 2021 Texas Renaissance Festival - 1001 Dreams Weekend

 
And, Jake and Liam meeting a fellow Mandalorian! 
When we took this picture we said "say this is the way" instead of "cheese" and he said it back and it sounded just like Mando!!!  Was so cool!!!  

So, that is IT!  I hope you enjoyed this journey just as much as I did!  I will now resume normal life and crafting and scrapbooking.  OH WAIT!  I have one more costume to make (Fennec) and I'll post when that's done too!


Wednesday, October 20, 2021

Halloween Costume Time!!!! Part 3 - 3D Printing

Last year, 2020, we purchased a 3D printer, with the initial use would be to print masks and face shield parts to donate for the medical community.  We had always wanted one, but never really knew much about them.  But, lots of people who had one were also printing stuff to help out, so we went ahead and got one.  We printed out masks and face shield parts for a few weeks, and were glad we could help out in some small way.

We then played around with our printer, enjoying the fun stuff we could do, printing things to help Dean, things to play with, and all that.  Then, after about 8 months, it clogged.  The feeder tube stopped feeding the filament, and it no longer worked.  We knew we needed to take apart the thing to see if we could fix it, but we "never got around to it".  Fast-forward to September 2021, we asked a friend who we know has a printer to print some Mando weapons for us since ours was broken.  He is a nice guy and of course offered to do that, and offered some suggestions to fix the old printer we have.  Well, we decided to give up on that and bought a NEW PRUSA 3D printer, and the quality of this thing is awesome!  We told our friend we got a new one and could print the guns, so we were off! 

  
This is Mando's "Amban phase-pulse blaster" (I had to look that up).  Dean found the pattern online for free so we went to town!


Here are the mando guns in progress!

Funny story. Liam (Jake's friend) asked if he was going to have "the back pack" for Boba Fett, and I said yes, if I have time, and had fully planned on making the thing out of cardboard and pipes.  HOWEVER, Dean found that pattern too!!!


This thing is huge, and really really cool!!!!


This is us priming the 3D prints after gluing them together.  Let me tell you, i'm not sure how people keep their 3D prints together, but we had the hardest time!  Superglue works, but one tap and it breaks, especially the blaster!  We will need to work on a solution for that in the future.

AND, after experimenting with paints, air brushing (I'll go into that once I get to the helmets again) and acrylic paint, here is the finished blaster!


Will post jet pack picture once I show you the helmet process first!


Tuesday, October 19, 2021

Halloween Costume Time!!!! Part 2 - Beskar Armor

To continue the EPIC costumes that are the Maldalorian...

Here we have the Armor for Mando primed and painted.  I used Plaid FX Flexible Acrylic Paint on this one.  It really turned out awesome!

Armor Pattern - this pattern is for Boba Fett, but I managed to change it up to look something like Mando's armor.  I used the pattern called "Complete Boba Fett Templates (WizardOfFlight Boba style Mandalorian plates – Downloadable)", should be the first one.


Here is Boba Fett's and Mando's "shirts".  I bought t-shirts from Hobby Lobby (since they are like under $3) and cut them to make something that a 10yr old boy would easily put on or take off!


This shoulder armor are my favorite pieces!  The Mandalorian logo is cut from vinyl on my cricut, the Mudhorn is from our new Prusa 3D printer.

All of the armor is attached using E6000 glue.  It does seep thru so be sure to glue it on paper or another surface you don't mind getting sticky.  Also once it's cured (48hrs) it's near impossible to remove!

In the Garage waiting for the glue to dry and cure.

All armor is cut from Black Foam Roll, primed and painted with Acrylic paints.  Fett's logos are all vinyl cut from my cricut.

Be back soon with the helmets and the weapons!


Monday, October 18, 2021

Halloween Costume Time!!!! Part 1 - Helmets

So, I pretend I'm a great customer maker. Like a cosplay level costume maker. I know I'm not.  HOWEVER I feel I'm close and getting better every year!

This year I talked my guys (my son Jake and his friend Liam) into being The Mandalorian (Din Djarin) and Boba Fett. I of course will be Cara Dune. And Liam's sister Missy into being Fennec Shand! It works because Missy's dad loves that character. Long story short, I told them I would make the costumes. This is a HUGE effort, but completely Awesome!

We started off by researching helmet patterns and how to do this thing. We found some excellent resources and got started!

This is Boba Fetts helmet in pieces. 
This is EVA 10mm compact craft foam. 
EVA foam Cutting tutorial - this lady is soooooo funny and super talented, so is her husband!  Enjoy!

This took a lot of work to cut! Follow that tutorial if you don't have a bandsaw, and you can do it.  Be patient, have fun!

So, after going to the hardware store for supplies, and lots of dremmel to smooth the edges, I put the helmet together

half way there

Right side done!

ALL together now!!

The best part of this is I get to do it all over again with Mando's helmet!!

So after sanding with a Dremel and adding the extra parts and stuff, we have this

AND after sealing and priming...
And repeating the whole thing, we get Mandos helmet
I actually totally forgot to seal this before priming and you can see the caulk filler difference. So I sealed it it as is and primed it again. MUCH BETTER.

So, next step is painting. We just bought an air brush. Let's hope I can figure that out!!